
AstroImager
Getting started with the INDIGO agents based backyard astrophotography application suite
About eight years ago we started to develop a software with the idea to make Apple macOS and iOS the first class platforms for backyard astrophotography.
At the beginning, the most important task was to add as many hardware drivers as possible. So we used the existing INDI framework. Later we focused on the performance and reliability and transferred the whole development to INDIGO framework.
In the latest generation we made so far the most radical change. We left the traditional client server approach and switched to multi-tier agent based architecture allowing even higher performance and reliability.
Core and utility applications of astrophotography suite
Unlike the other similar systems, our suite is not a single monolithic application, we use standalone loosely coupled applications instead. This approach has some advantages and some drawbacks. The major advantage is that you can select just tools you really need and use them only when you really need. The disadvantage is that you need to understand how the applications work to configure them to talk to each other properly.
There are four core applications and a couple of utility applications in our suite. The core applications are:
- AstroImager, the application for controlling the main camera and the associated filter wheels, focusers and the front end for "Imager Agent",
- AstroDSLR, a very similar application, but intended specifically for tethering DSLRs and another front end for "Imager Agent",
- AstroTelescope, the application for controlling the dome and the mount and the front end for "Mount Agent" and
- AstroGuider, the application for controlling the guider camera and guider port of the mount and the front end for "Guider Agent".
The utility applications are:
- INDIGO Server, the standalone server for building distributed systems,
- INDIGO Control Panel, the standalone control panel,
- INDIGO Script Editor, the standalone INDIGO script editor,
- INDIGO Dashboard, the highly configurable dashboard for low level server control,
- FITS Preview, the fast previewer for FITS, XISF and INDIGO RAW formats and
- Astrometry, the macOS port of substantial part of Astrometry.net project.
Please note, that every core application contains an embedded server, control panel and script editor. The standalone versions are intended for advanced use and are not necessary in the most cases.
About INDIGO and INDIGO agents

INDIGO is a system of standards and frameworks for multiplatform and distributed astronomy software development.
You can consider it as a next generation of INDI, based on layered architecture and software bus. INDIGO uses the same astronomical hardware abstraction as INDI, but removes some of its design limitations, dramatically improves its performance in some typical scenarios and overcomes license restrictions to allow both non-commercial and commercial use.
If you don't want to, you don't need to care about INDIGO complexity and its distributed nature. Each application contains embedded INDIGO Server together will all necessary drivers. You can just use it.
Although INDIGO was always well prepared for a distributed computing, for many situations the traditional client/server is not the best approach. The most important driver for the change was implementation of webGUI on INDIGO server. The thin client running in a browser needs a much smarter backend than INDIGO server itself, it needs a server side application logic. We use term INDIGO agent for this code, acting on the server side and controlling the local devices on behalf of the client.
Such an agent is independent of the connection to the client. The client can configure it, disconnect and keep it running, doing its job and connect later to monitor the status or to take the results. The communication between the driver and the agent is also not limited by network bandwidth as far as they both live in the same INDIGO server and can communicate to each other over the software bus on a procedure call speed.
And last but not least, as far as agent code contains the vast majority of application logic for typical operations supported by the applications for amateur astronomy. Implementation of the client is in this case just implementation of native GUI for a given operating system. It is faster, easier and possible bugs can be fixed on one place.
To learn more about INDIGO or INDIGO agents or to ask a question, visit FAQ section of our users forum.
What's new in the version 4.0
- The initial version of the 4th generation.
- INDIGO framework version 2.0.148.
AstroImager overview
AstroImager is a front end for imaging and auxiliary devices INDIGO agents. Its purpose is to control main imaging camera, filter wheel and focuser, to allow proper framing, focusing and capturing from a single batch of images to quite complicated series of images with different parameters and settings.
It can control many devices supported by built-in INDIGO drivers or it can use any 3rd party remote INDIGO or INDI driver. Out-of-the-box it contains INDIGO drivers for the following cameras, filter wheels and focusers:
- CCD, focuser and wheel simulator drivers,
- Atik CCD and wheel drivers (Intel only),
- ZWO ASI CCD, wheel and focuser drivers (doesn't work with non-S ASI120MM/MC, Intel only),
- IIDC CCD driver (both USB and FireWire cameras),
- QHY CCD and filter wheel drivers (Intel only),
- SBIG CCD and filter wheel driver (vendor SDK must be installed, Intel only),
- Meade DSI CCD driver,
- Orion SSAG/QHY5 CCD driver,
- StarlightXpress CCD and wheel drivers,
- QSI CCD and wheel driver (Intel only),
- FLI CCD and wheel driver,
- Apogee CCD driver,
- Moravian Instruments CCD and wheel driver (Intel only),
- ToupTek CCD driver (Intel only),
- AltairAstro CCD driver (Intel only),
- UVC (USB Video Class, e.g. SVBONY SV205) CCD driver,
- Trutek (TruTech) wheel driver (untested),
- Brightstar Quantum wheel driver (untested),
- Xagyl wheel driver (untested),
- Optec wheel driver (untested),
- QHY CFW wheel driver,
- Manual filter wheel driver,
- Shoestring FCUSB driver,
- Focuser USB v3 driver,
- WeMacro Rail USB driver,
- MJKZZ macro rail USB driver,
- PegasusAstro DMFC and FlatMaster drivers,
- RigelSys nSTEP and nFOCUS drives,
- MoonLite focuser driver,
- Optec focuser driver (untested),
- LakesideAstro focuser driver (untested),
- Deep Sky Dad AF1, AF2 and AF3 focuser driver,
- Baader Planetarium SteelDrive II focuser driver,
- AstroGadget FocusDreamPro focuser driver,
- RoboFocus focuser driver,
- MyPro2 focuser driver,
- Lunatico Limpet/Armadillo/Platypus Focuser/Powerbox drivers,
- PlaneWave/Celestron focuser driver,
- Unihedron SQM sky quality meter driver,
- Artesky flatbox driver,
- Lacerta Flat Box Controller driver,
- Optec Flip-Flat driver,
- USB_Dewpoint V1 and V2 driver,
- Lunatico AAG CloudWatcher driver,
- Astromi.ch MGBox v1/v2, MBox, MGPBox and PBox driver,
- Interactive Astronomy SkyAlert driver.
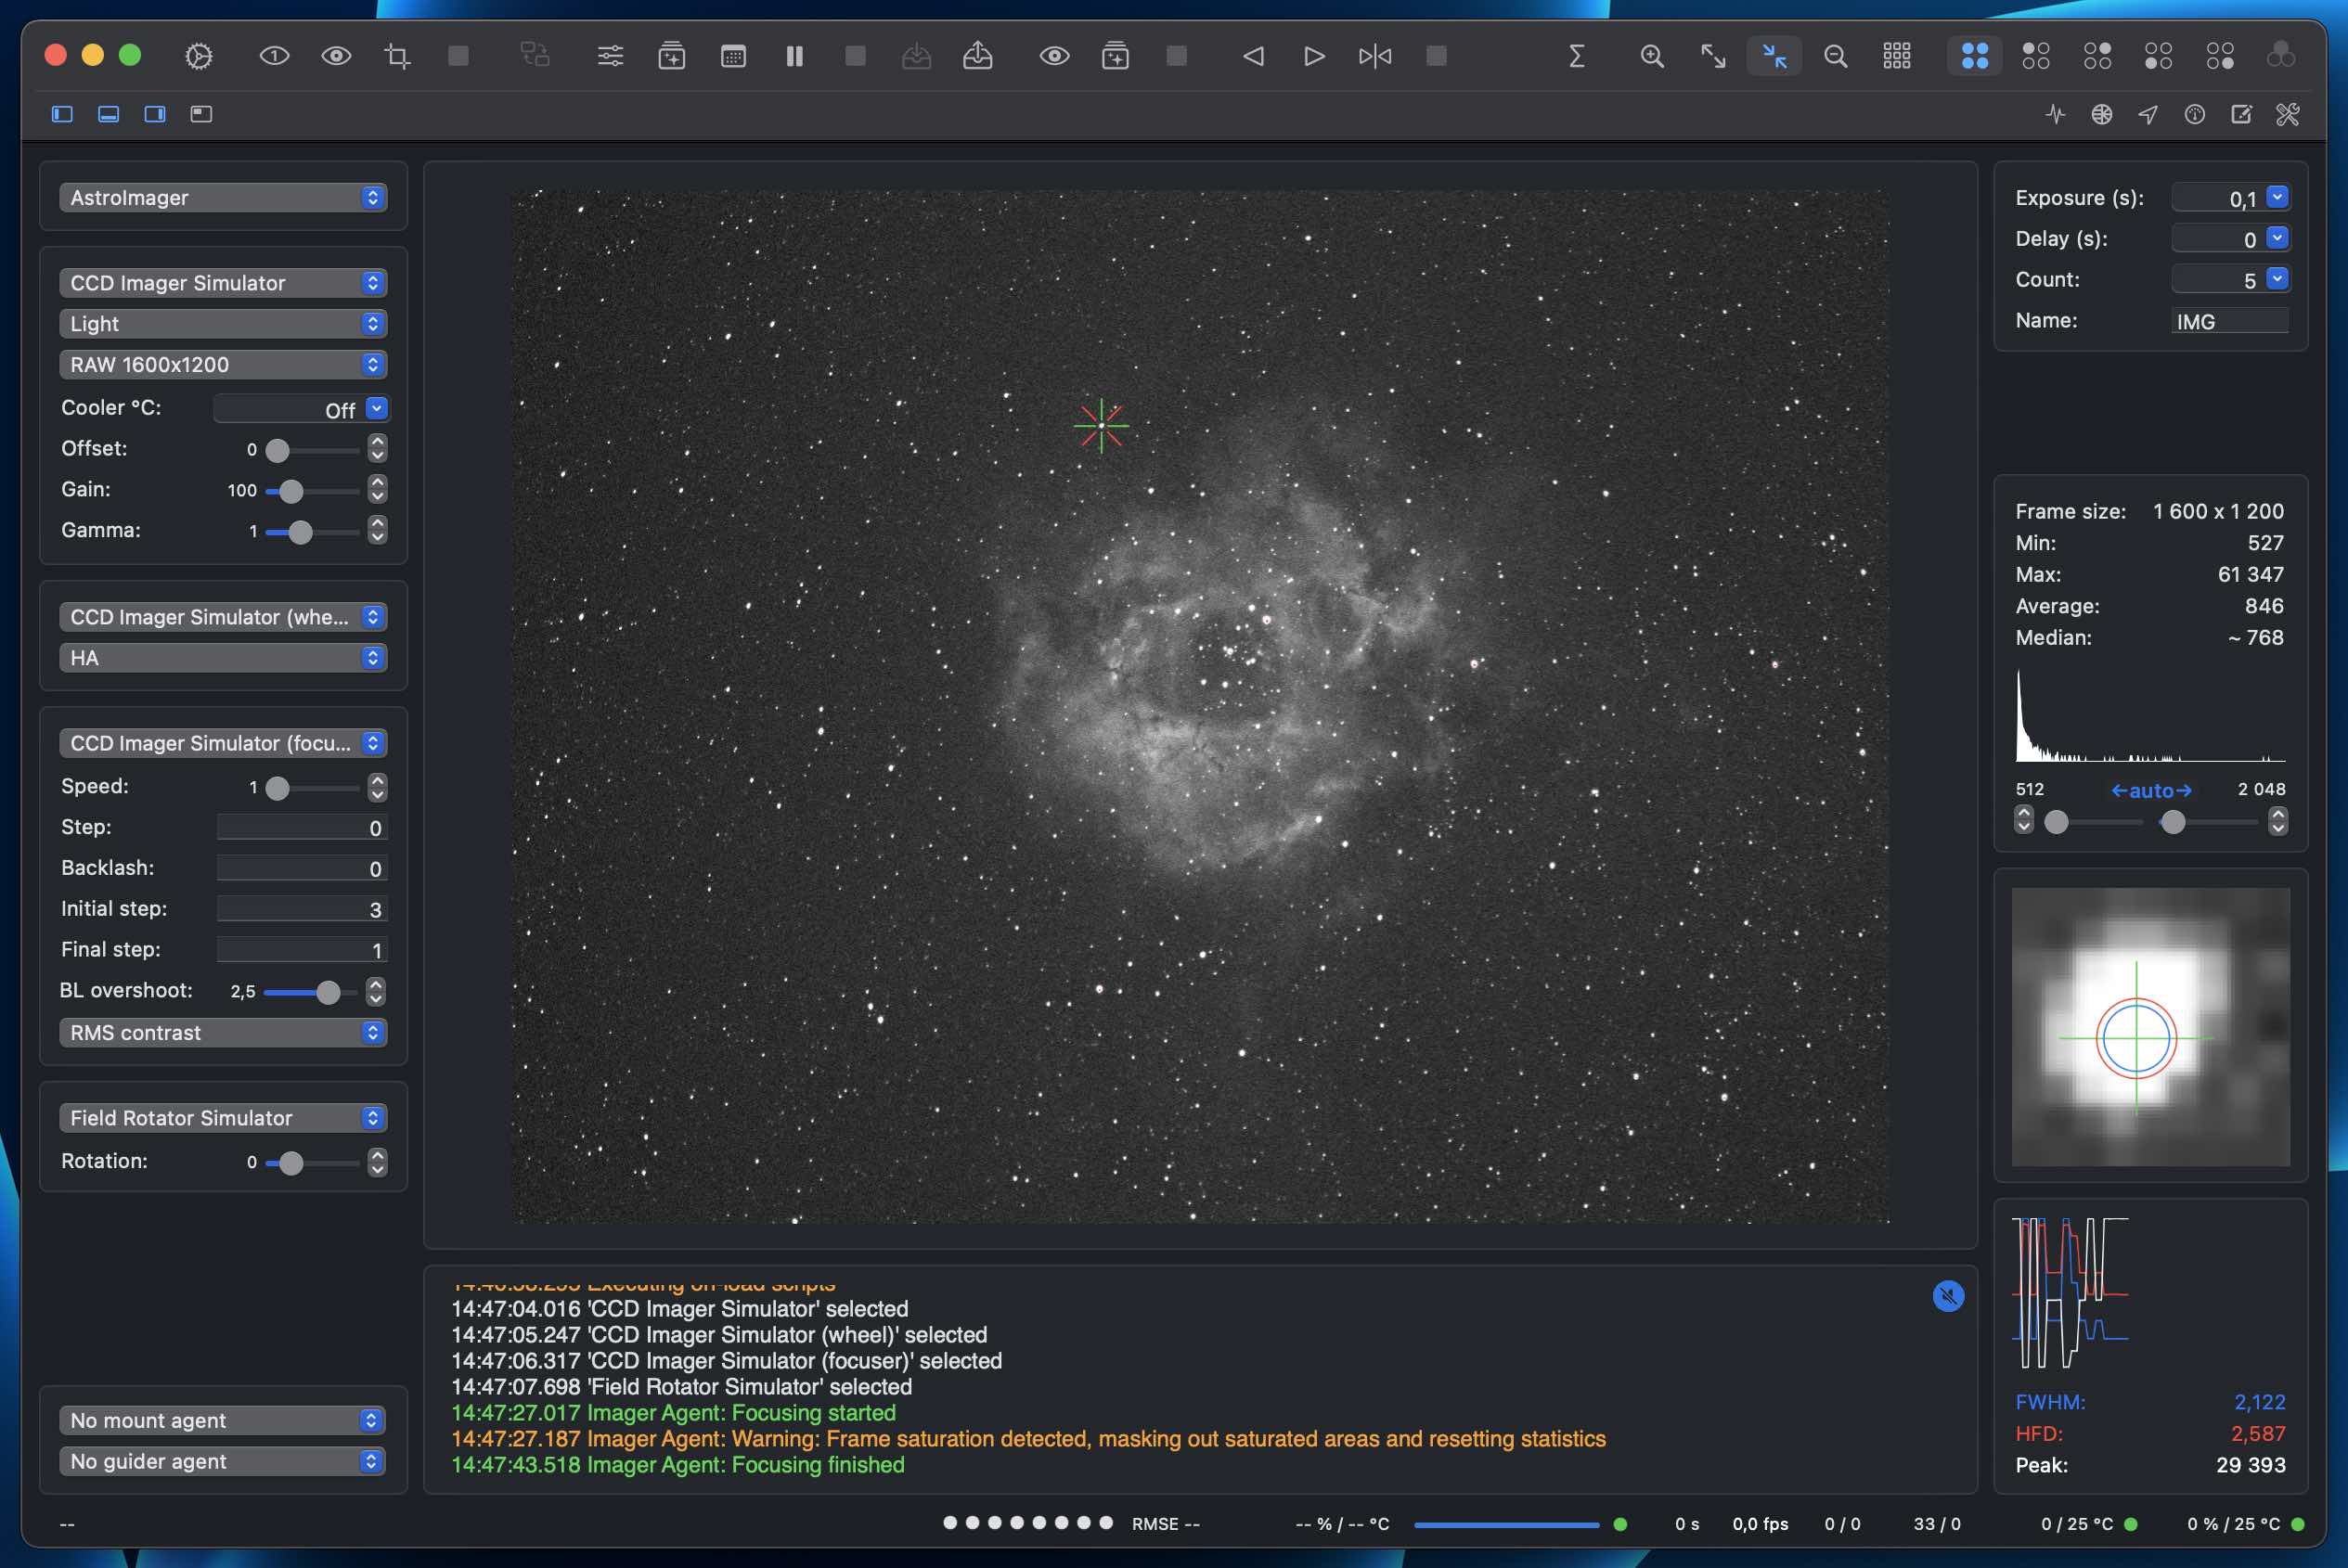
AstroImager graphical user interface
On the left side of the main window, from top to bottom, there are controls for selecting an active imager agent, active camera and its configuration, capture batch definition, active wheel and its configuration, active focuser and its configuration and related mount and guider agents used for inter-agent communication.
On the right side of the main window, from top to bottom, there are a histogram panel with black and white point settings, a detailed view of the selected star and a graph with PSF values for a selected star. To select a star just point and click with the mouse. To deselect it, click with the right mouse button.
In the middle there is a preview of the recently captured image and the messages from both AstroImager and remote INDIGO servers and drivers.
On top of the window there are two rows of toolbar buttons (move the mouse pointer above the button to see a tooltip with an explanation) and on the bottom of the window is status.
Different parts of the window may be shown or hidden with four show/hide panes buttons on the left side of the second toolbar row. All other application panels, script and control panel windows can be shown with buttons on the right side.
The safest way how to get familiar with different AstroImager functions is to select simulator devices and play with them a little bit.
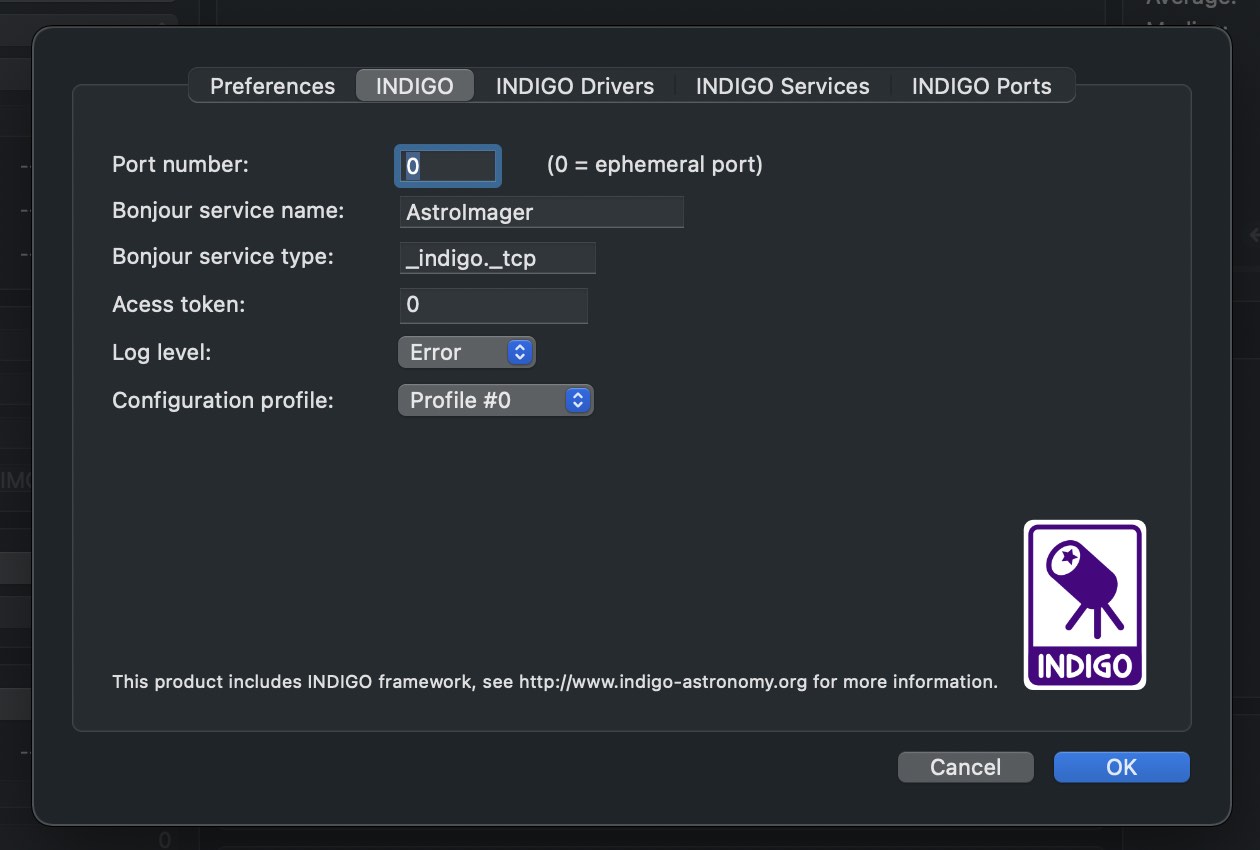
AstroImager preferences

In AstroImager preferences you can set various settings for AstroImager GUI and for the embedded INDIGO client.
On the first pane you can configure the user interface. The only option which is not quite straightforward is output format. FITS, XISF, TIFF and JPEG options are formats requested from CCD drivers for batch capture when you want to save individual image files. JPEG & AVI and RAW & SER options select JPEG or RAW capture format and subsequently encode the frames into a single video stream file. Note, that RAW is INDIGO RAW format, not DSLR RAW format like NEF or CR2.
On the INDIGO pane you can configure the port number, service name and type for built-in INDIGO server. Access token is a password used to access protected remote INDIGO services.
Log level is logging verbosity for GUI and built-in INDIGO server. Read this post to learn how to make a debug or trace log.
Configuration profile is the profile used to save and load persistent state of the INDIGO server and drivers. Don't change it unless you know what you are doing.
On the INDIGO Drivers pane you can enable or disable different INDIGO drivers. Don't enable drivers you don't need, all loaded drivers consume resources of your computer and some of them are mutually exclusive. Check this page to learn more about individual INDIGO drivers.
On the INDIGO Services pane you can see automatically detected INDIGO services and also to configure some of them manually, e.g. legacy INDI servers or services running outside your local network.
On the INDIGO Ports pane you can configure a serial port for those drivers which need it. Note, that these settings supersede the saved value of PORT property of the driver.
Imager agent setup

In agent setup panel you can configure the active imager agent.
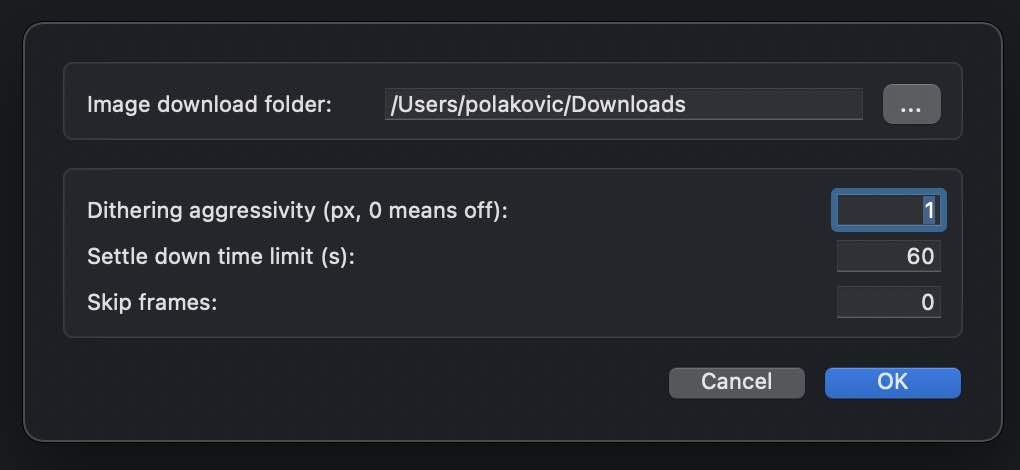
Image download folder is the folder used to download captured images. In case of embedded imager agent the images are saved immediately, while in case of remote imager agent, the images are downloaded only on request.
Each time the image is being saved or downloaded, the file name template is created depending on preferences and the file index is incremented to keep all previously saved or downloaded images with the same file name template.
Dithering aggressivity is the maximum number of pixels (in the guider pixels resolution) to offset the guider reference point between the captures. The request is sent to the related guider agent configured in the main window.
Capture preview, regular or video frames with AstroImager
To capture preview or regular frames make sure the camera is selected on the active imager agent.
There are two substantial differences between preview and regular or video captures. For preview is always used the INDIGO RAW format and the images are not saved anywhere. For regular capture the output format selected in the preferences panel is used and the frames are saved either locally in the folder configured in the agent setup panel or on the remote server. In case of video streaming a different mode is used on the device driver and frames are pushed instead of pulled. It may be faster and the quality may be lower.

In the preview mode, you can capture a single frame, capture frames in an infinite loop or to set a subframe selected by mouse and capture. The subframe is subsequently used for preview or regular captures. To reset the subframe just use set subframe capture without any subframe selected. To stop the preview loop, press a stop preview button.

In the regular capture mode, you can capture an exposure batch configured in the exposure batch panel. An exposure time, delay between exposures, frame count and file name template have to be set. The capture can be paused or aborted with pause exposure or stop exposure buttons.

For video streaming you can choose either preview in endless loop or to capture a batch. Both can be aborted anytime with a stop streaming button. To capture a video stream until the stop streaming button is pressed, set frame count to -1.

Once capture on a remote imager agent is finished, you can download the images to the folder configured in the agent setup panel. For the local image agent this step is not needed, the frames are saved immediately.
Capture sequences with AstroImager

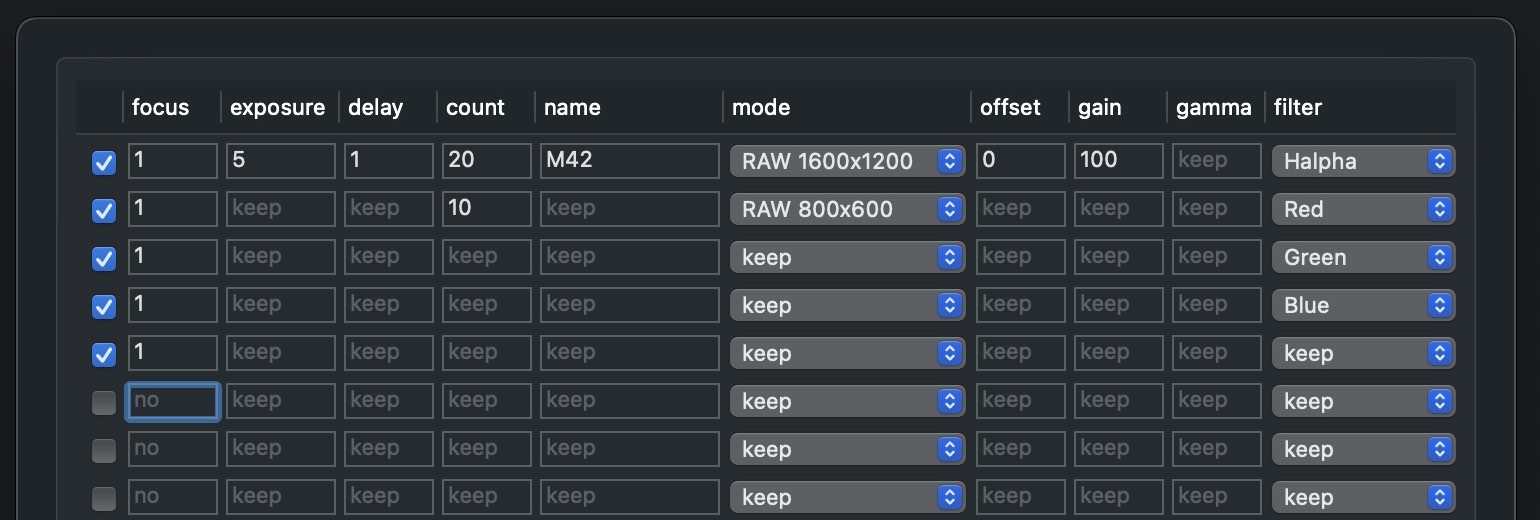
Sequencer can be used to configure multiple capture batches with different camera and batch parameters and optionally different filter or autofocusing.
Only the checked lines are executed and only the fields with a value different than "keep" are used to change the parameters for the next batch.
The value in focus field is the exposure time for autofocus routine. In addition, backlash, initial step and final step values from the focuser configuration panel in the main window are used. Read this post to learn more about autofocus routine.
The whole sequence can be repeated as many times as you want. Once the sequence is finished, the mount controlled by the related mount agent can be parked and the cooler of the active camera can be turned off.
The sequence can be started or just saved from the sequencer pane. Once it is started, it can be paused or stopped with pause exposure or stop exposure buttons.
Autofocus with AstroImager

To use autofocus, make sure the camera and the focuser are selected in the main window.
Set some sensible exposure time, long enough to make stars visible on even slightly defocused frames, select some star near the image center or deselect any previously selected object (and in such case the best star will be selected automatically), set the backlash and the initial and final step values in the focuser configuration panel and click the start autofocus exposure button in the toolbar. The routine can be aborted by pushing the stop focuser button.
If needed, the focuser can be also moved manually with focus in or focus out buttons. If the step value in the focuser configuration panel is set to a non-zero value, the configured number of steps are executed on every button press. If it is set to the zero value, the focuser will be moved in or out while the button is pressed.
Read this post to learn more about autofocus routine.
Polar alignment with AstroImager and the drift method

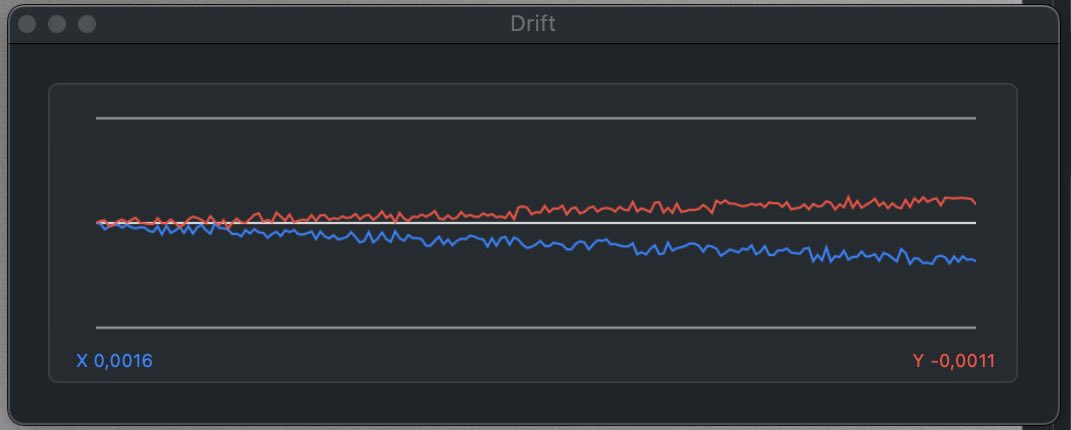
For polar alignment by the drift method or for the validation of the guiding you can use drift measurement helper panel.
The scale of the graph is adjusted automatically. Blue curve represents drift in X and red curve in Y direction. Blue value in lower left corner is drift per image in X direction and red value in lower right corner is drift per image in Y direction.
To use the panel for polar alignment, rotate camera (to align RA/Dec axes along X/Y directions), start preview in endless loop, select accordingly bright star and use drift method.
Please note, that the graph is cleared every time you select the star in the preview image.
To learn more about how align your mount read this Wikipedia article.
Focusing with AstroImager and the bahtinov mask

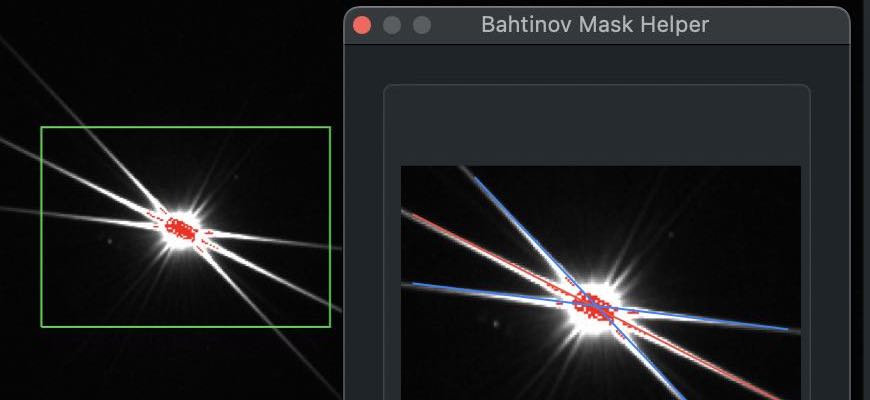
AstroImager can help you to focus faster and more reliably with Bahtinov mask focusing aid.
To use it just point your telescope to some bright star, put the mask on, open helper panel and select rectangle by the mouse over the captured image in preview panel to center the diffraction pattern in the panel view. Once centered, two blue and one red (not properly focused) or green (properly focused) line will appear and show the intersection of diffraction spikes.
Telescope is properly focused when the focus error is within critical focus zone. Due to limitation of the line detection algorithm make sure, that each diffraction spike is always crossing the opposite sides of the frame.
Please note, that telescope focal length and aperture needs to be set in preferences to calculate the focus error and the critical focus zone.
To learn more about how Bahtinov mask works read this Wikipedia article.
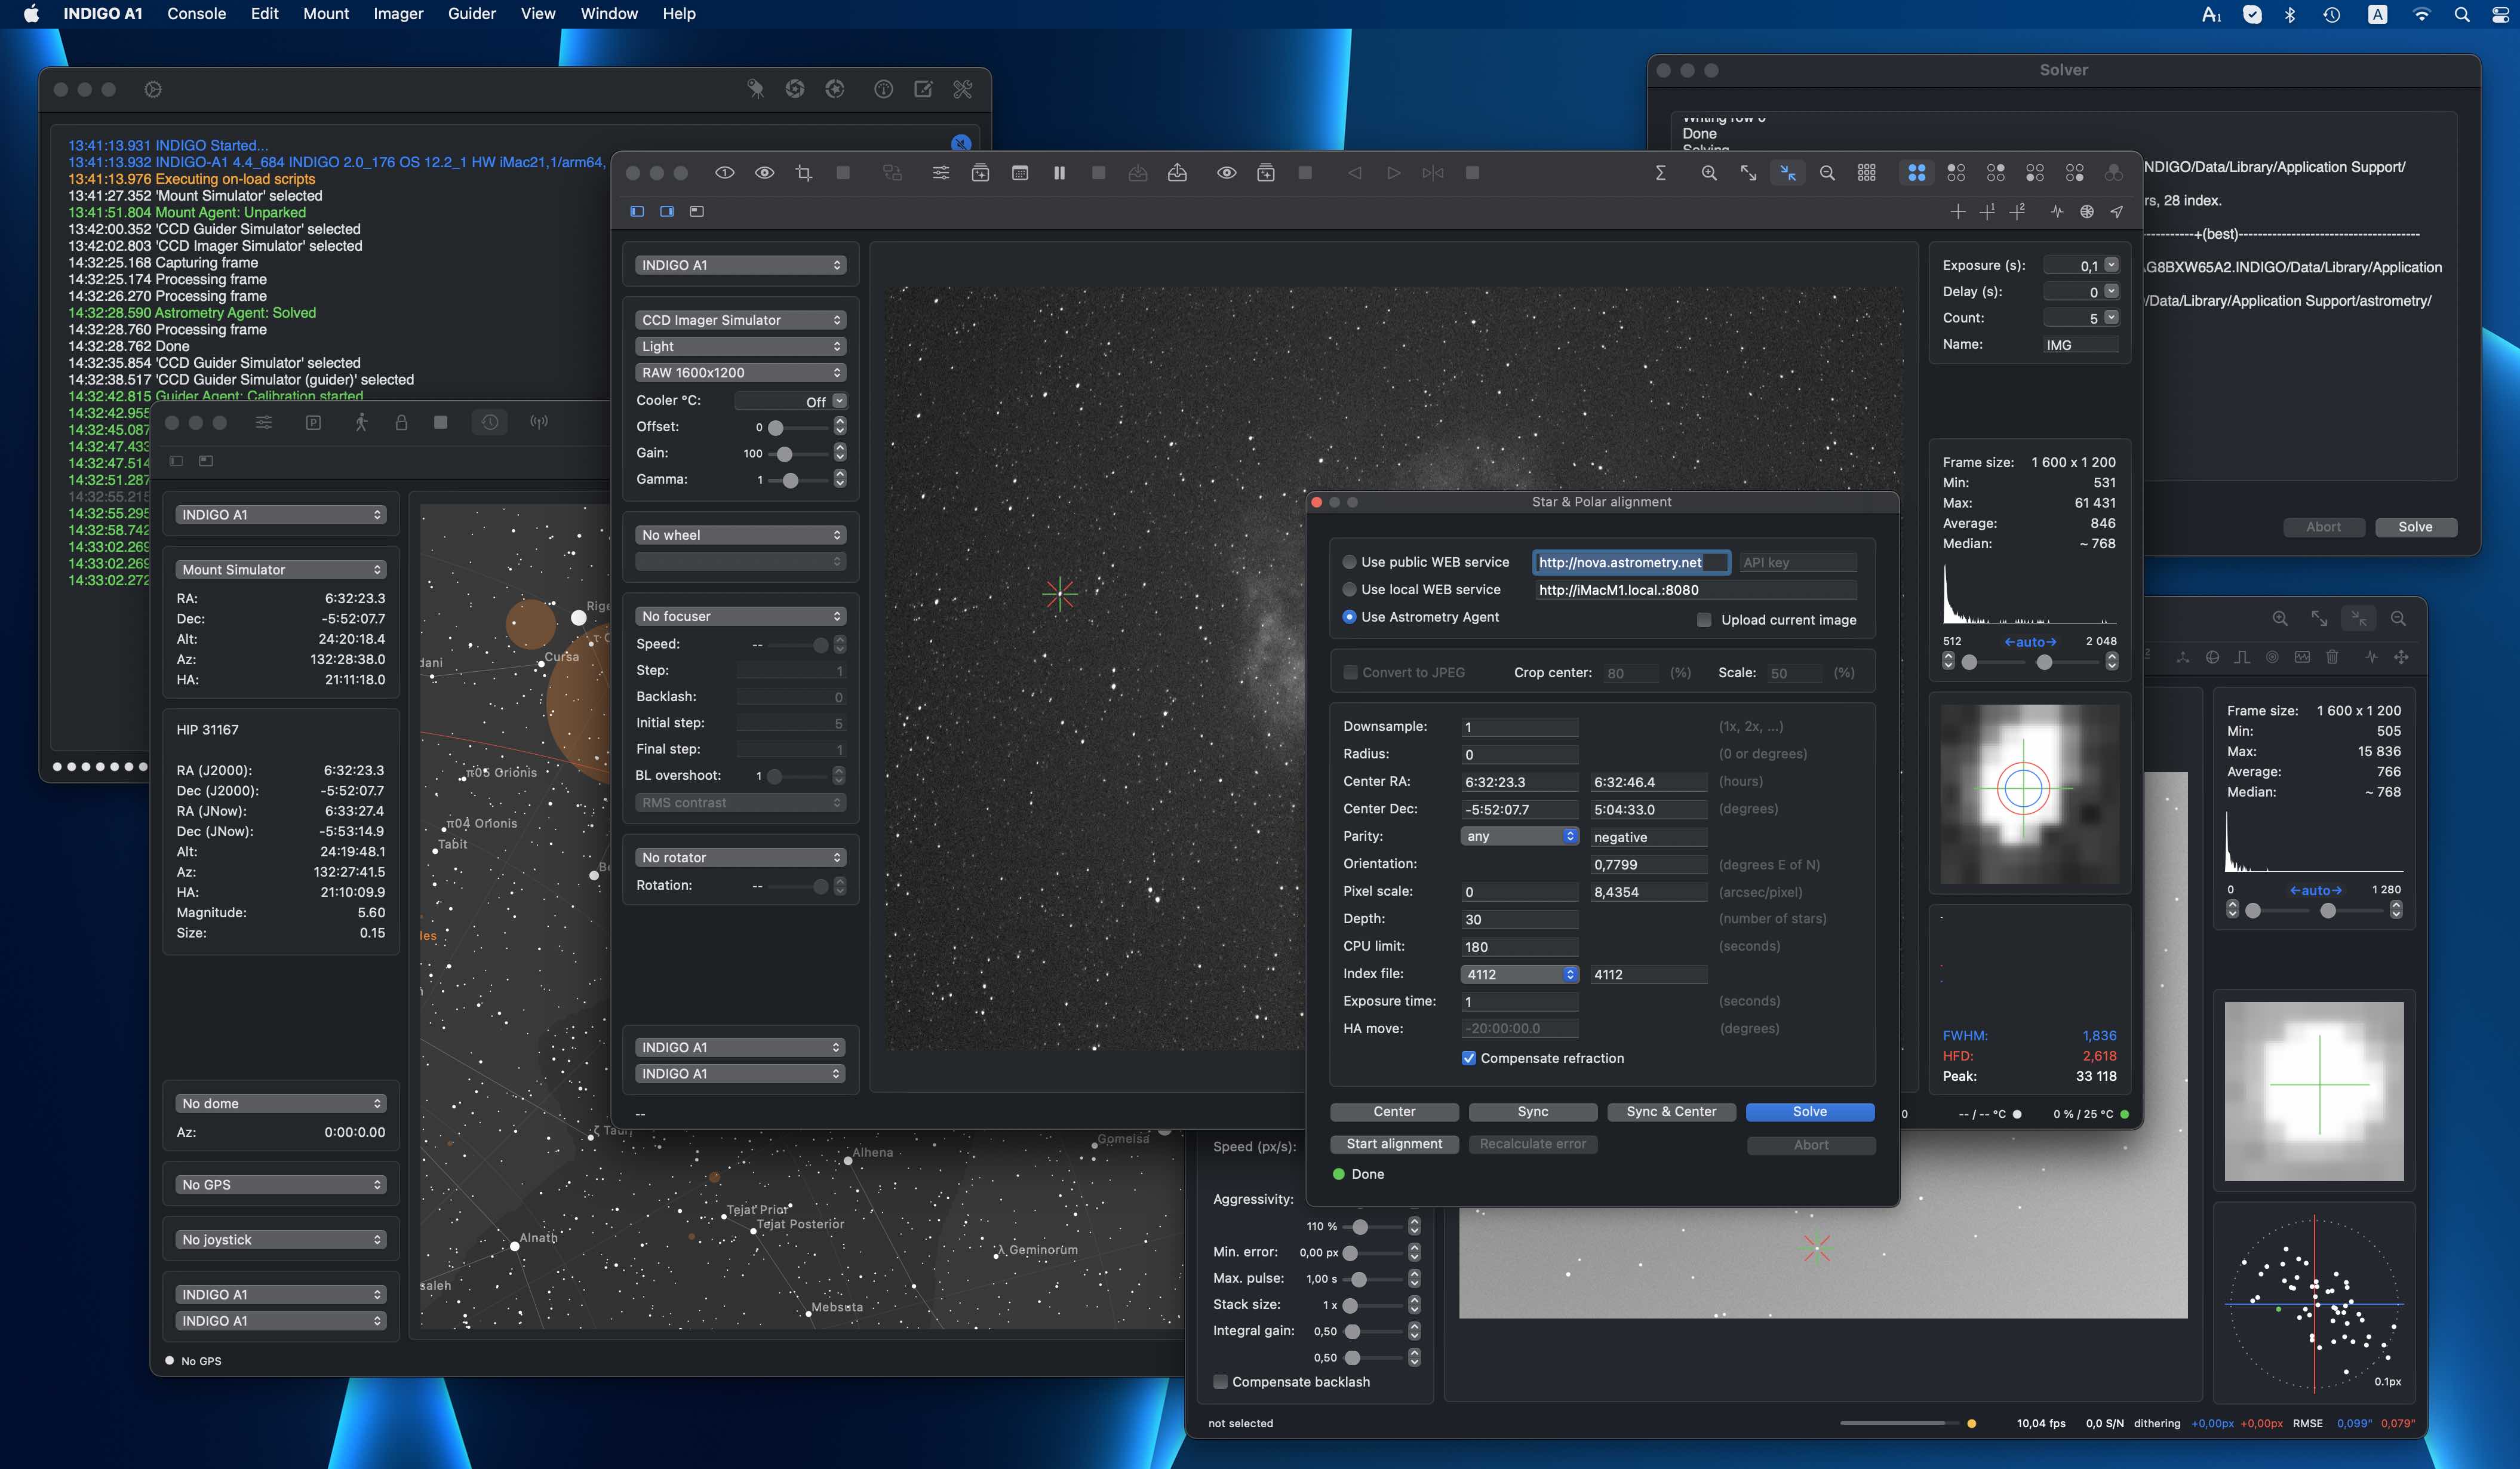
Plate solving and mount alignment with AstroImager and Astrometry.net

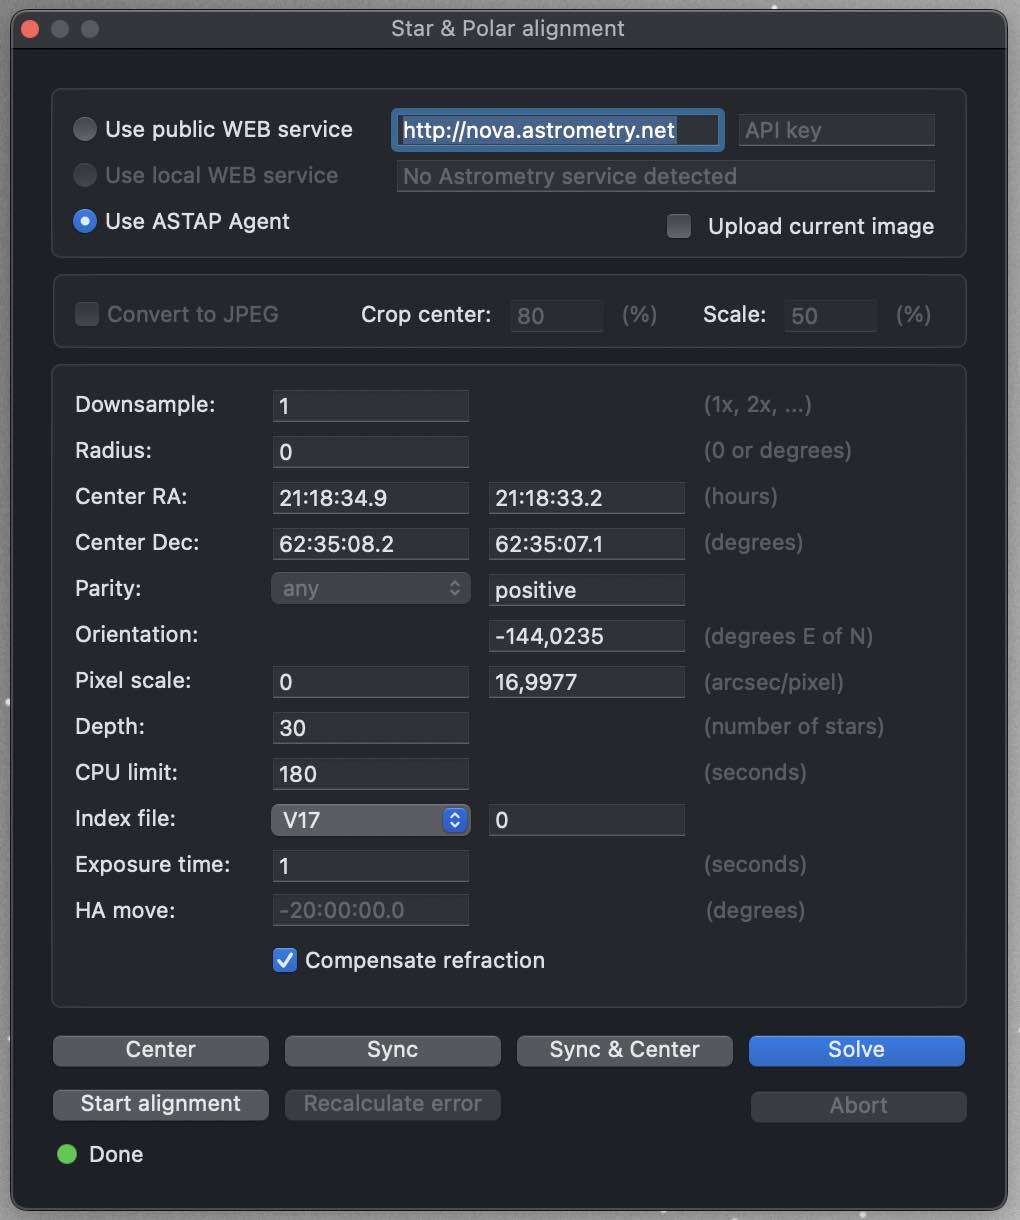
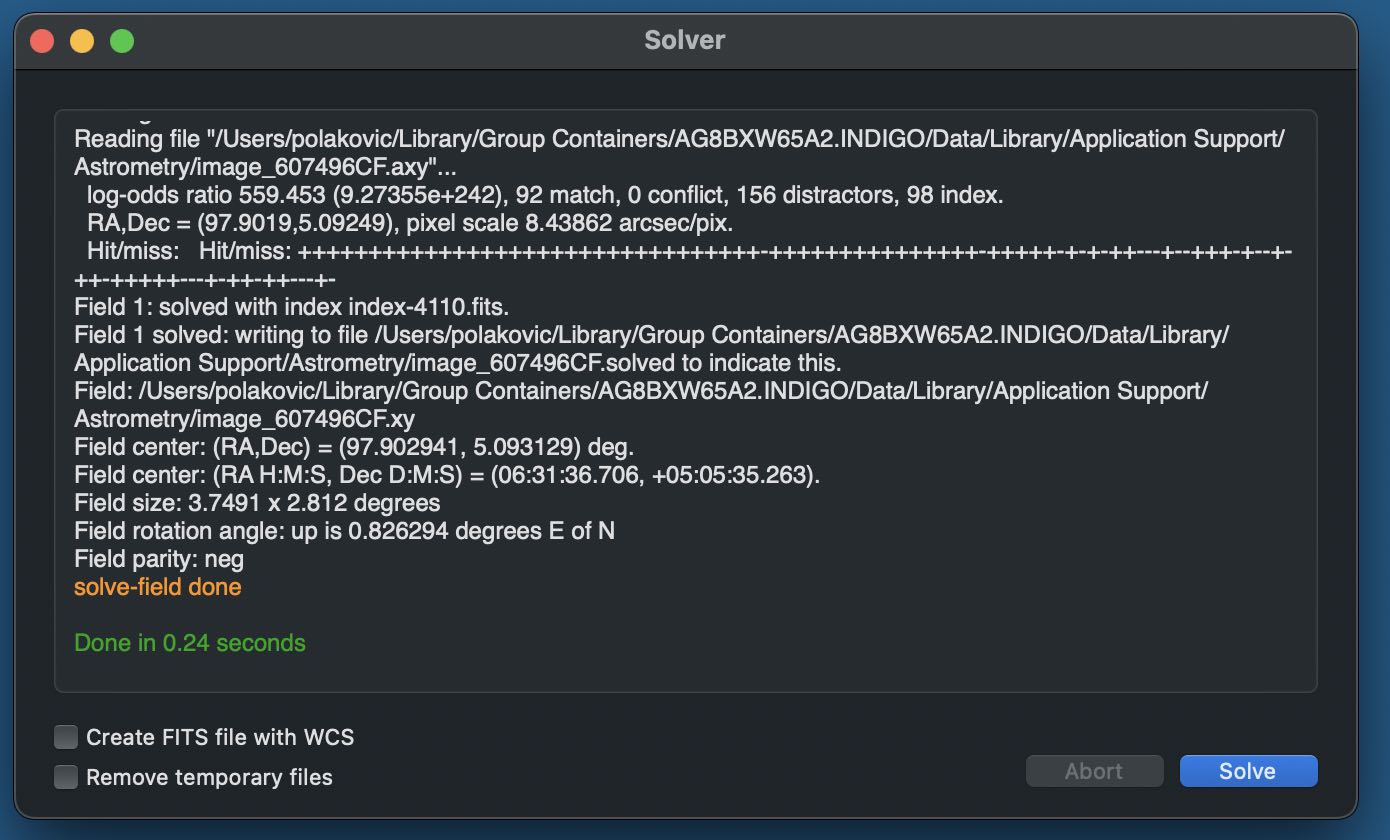
Plate solving in AstroImager is intended to speed up mount alignment and/or to do it automatically (e.g. for automated meridian flip) and it supports 3 different modes - public or local WEB service and astrometry agent.
Public WEB service - this mode uses public web service like nova.astrometry.net, so you need to have an account on such portal and you need to know your API key (see API section of the portal).
- capture a preview frame (select a camera, set exposure time, get a single exposure preview), open plate solver panel,
- select "Use public WEB service option", make sure the service URL is correct and API key is entered,
- in case of public WEB service is image always converted to JPEG format to save bandwidth, but you can control the scale (e.g. to 50% or even 25%) to speed up the transfer and the solving and it may be useful to crop the image (e.g. to 80%) if your lens or telescope doesn't provide really flat field,
- optionally enter some configuration parameters and hints for plate solver: downsample (downsample the image before extracting star coordinates) or parity (image orientation, it is better to start from "any" unless you don't know it). If AstroTelescope or another mount agent is running and selected as "related mount agent" in the main window, the current coordinates are filled in and you can set radius to narrow the search,
- click "solve" button to submit the job to a remote service and wait until done (or failed), it may take even couple of minutes,
- if successfully done, click either "sync" button (to tell AstroTelescope or other mount agent to SYNC its current position to the computed center of the image) or "sync & center" (to SYNC first and then slew to the selected target again).
Local WEB service - this mode uses local web service provided by Astrometry for macOS application. You can download it for free from its product page.
- Make sure Astrometry for macOS is running and has a proper indexes installed (read astrometry.net README file to identify what index files you really need),
- capture a preview frame (select a camera, set exposure time, get a single exposure preview), open plate solver panel,
- select "Use local WEB service option" and make sure the service URL is correct,
- in case of local WEB service is image optionally converted to JPEG format to save bandwidth and you can control the scale (e.g. to 50% or even 25%) to speed up the transfer and the solving and it may be useful to crop the image (e.g. to 80%) if your lens or telescope doesn't provide really flat field,
- optionally enter some configuration parameters and hints for plate solver: downsample (downsample the image before extracting star coordinates), parity (image orientation, it is better to start from "any" unless you don't know it), depth (the number of top brightest star to take into account) or CPU limit (solving will fail if not finished within the time limit). If AstroTelescope or another mount agent is running and selected as "related mount agent" in the main window, the current coordinates are filled in and you can set radius to narrow the search,
- click "solve" button to submit the job to a remote service and wait until done (or failed), it may take even couple of minutes,
- if successfully done, click either "sync" button (to tell AstroTelescope or other mount agent to SYNC its current position to the computed center of the image) or "sync & center" (to SYNC first and then slew to the selected target again).
Local or remote astrometry agent - this mode uses astrometry agent running on the same INDIGO server as currently selected imager agent (nevertheless, mount agent can run on the same or any other server). No image transfer is involved, so it is much more efficient than web service.
- open any INDIGO control panel, navigate to the agent you want to use and make sure a proper indexes are installed (in case of local agent you can do it in Astrometry for macOS Index manager as well),
- select a camera and set exposure time,
- open plate solver panel,
- select "Use astrometry agent" option,
- optionally enter some configuration parameters and hints for plate solver: downsample (downsample the image before extracting star coordinates), parity (image orientation, it is better to start from "any" unless you don't know it), depth (the number of top brightest star to take into account), CPU limit (solving will fail if not finished within the time limit) or the index file to use (select "any" to use all installed index files). If AstroTelescope or another mount agent is running and selected as "related mount agent" in the main window, the current coordinates are filled in and you can set radius to narrow the search,
- click "solve" button to solve the image only, "sync" button (to solve the image and then tell AstroTelescope or other mount agent to SYNC its current position to the computed center of the image) or "sync & center" (to solve and SYNC first and then slew to the selected target again).
Read this post to learn more about astrometry.net integration.
Visit astrometry.net pages to learn more about underlying technology.
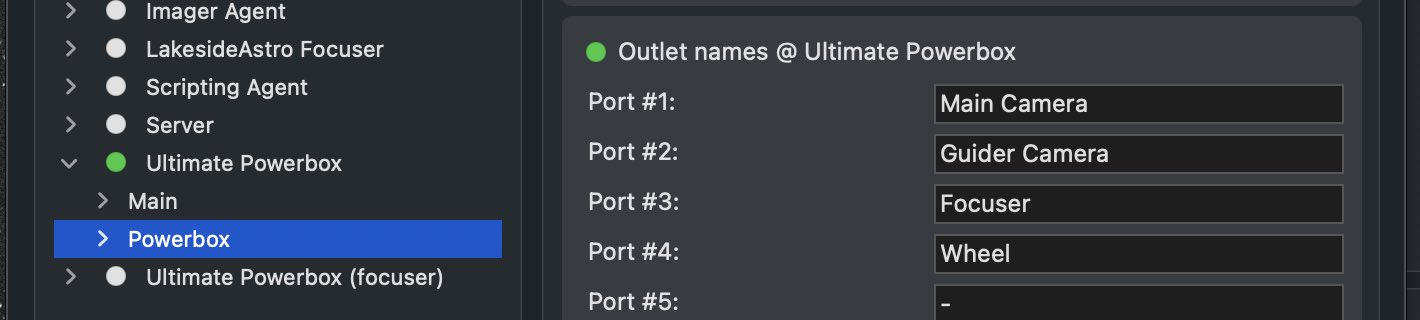
Manage AUX devices with AstroImager

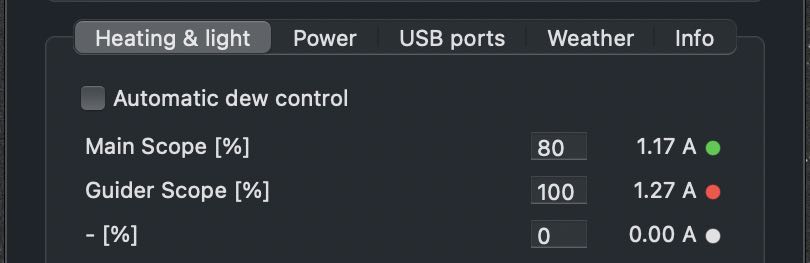
Aux panel controls up to four AUX devices controlled by the selected agent.
The devices may be power boxes, weather stations, light boxes or any other devices reporting values through INFO property.
Further configuration of such devices, e.g. renaming their outlets or ports, is possible with the build-in control panel. Remember to save the device configuration each time you change the outlet or port names.
Scripting AstroImager

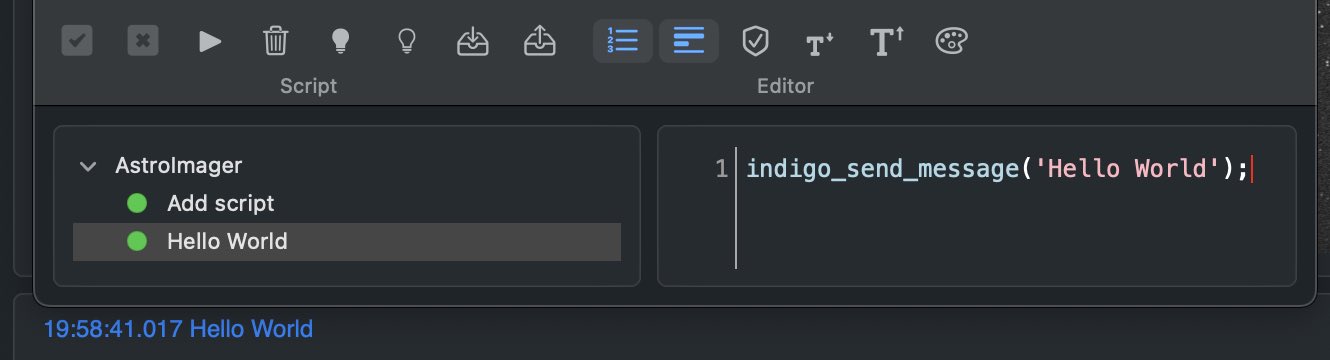
INDIGO Script is a built-in scripting language based on ECMA Script with binding to the INDIGO objects and functions. Scripts may be executed manually, on agent load or unload or registered as event handlers and triggered by any INDIGO events.
Scripts are executed by Duktape engine wrapped into a scripting agent. To learn more about the language, visit Duktape site.
To learn more about INDIGO bindings, read scripting agent README.
To see some real world scripts look at INDIGO Script subforum.
Low level INDIGO control with AstroImager

In control panel you can manage all properties of all devices hosted by local INDIGO bus.
To change a property, navigate in device / Group / Property tree, enter new values of the items (changed values became orange) and click Set.
If you want AstroImager to use changed values on the next start, save configuration in "Configuration control" property in "Main" group of the device. You can also set particular profile in "Profile selection" property first. Remember, that not all properties are actually persistent, values of some of them can't be saved, e.g. for security reasons.
AstroImager device represents AstroImager itself and can be used by scripting tools etc.
Please note, that embedded control panel can be used only to control local devices. To access remote devices you need full featured INDIGO Control panel.
Further questions?
Please contact us at info@cloudmakers.eu or bb.cloudmakers.eu.