AstroTelescope overview

AstroTelescope, is a simple planetarium and telescope control application for the astrophotography.
Star map in AstroTelescope can be displayed in any scale and rotated by any angle, with selectable star density and with or without star names. Hipparcos Catalogue and selected NGC and IC DSO object are available from the application locally, but any object can be searched online by calling public SIMBAD service on Strasbourg Astronomical Data Center.
Application can control connected mount both by selecting object on the star map or manually, mount position can be synced automatically to the centre of the solved image in AstroImager application.
Application can synchronise mount, dome, GPS received and joystick drivers to work together on INDIGO bus.
It can control many devices supported by built-in INDIGO drivers or it can use any 3rd party INDIGO or INDI driver. Out-of-the-box it contains INDIGO drivers for the following mounts and other devices:
- Simulator drivers,
- LX200 compatible mount driver (Meade, Avalon with StarGO, Losmandy Gemini, 10microns, EQMac, ... serial or network connection),
- NexStart compatible mount driver (SkyWatcher, Celestron, Orion, ... serial or network connection),
- SynScan/EQDir mount driver,
- Takahashi Temma mount driver,
- iOptron mount driver,
- HID joystick AUX driver,
- NMEA GPS driver,
- PegasusAstro Ultimate Powerbox driver.
What's new in version 3.9
- INDIGO framework updated to 2.0.85,
- new embedded control panel,
- new star map component,
- SynScan (EQDir) driver added.
What's new in version 3.8
- INDIGO framework updated to 2.0.76,
- new keyboard shortcuts.
What's new in version 3.6
- INDIGO framework updated to 2.0.75,
- auxiliary device panel added,
- PegasusAstro Ultimate Powerbox driver added,
- more Mojave dark appearance cleanup.
What's new in version 3.5
- INDIGO framework updated to 2.0.74,
- iOptron driver added,
- Mojave dark appearance support added.
What's new in version 3.4
- Application migrated to INDIGO driver stack version 2.0.73.
- INDIGO joystick and GPS support added.
Please note, that AstroTelescope contains many INDIGO drivers, but none of them is loaded by default. To enable the driver you actually need, select it on Preferences → INDIGO Drivers pane. You may need to scroll down to find some of them.
Initial setup and preferences

When AstroTelescope is started for the first time or when button in toolbar is clicked, preferences panel is shown. It has six different panes. On the first three there are general, observatory and star map settings and the rest is related to INDIGO framework.
If you want to control AstroTelescope from 3rd party applications like SkySafari, you can start internal LX200 server. Make sure that selected port (default value is 4030) doesn't conflict with another port used by other applications (e.g. EQMac).
Don't select "Set the site coordinates..." on the Observatory pane if your mount has GPS or if you use external GPS.
Don't use too hight star density or too fast refresh interval on Star Map pane unless you really need it. It will increase CPU use and energy impact.
Port number, Bonjour service name and Bonjour service type are parameters for configuration of internal INDIGO server. Do not change them unless you understand how INDIGO works.
If you have more than one serial device connected to your computer, make sure that the correct port name is selected for the mount, dome and GPS.
If something will go wrong you can try to set Log level to debug or trace to see more verbose output from INDIGO framework.
AstroTelescope will connect to any INDIGO server in the local network automatically, but if you want to configure connection to a service without Bonjour support (e.g. linux based INDI server or INDIGO server outside local network), you can do it on INDIGO Services pane.
Mount and current object panels, operations and state

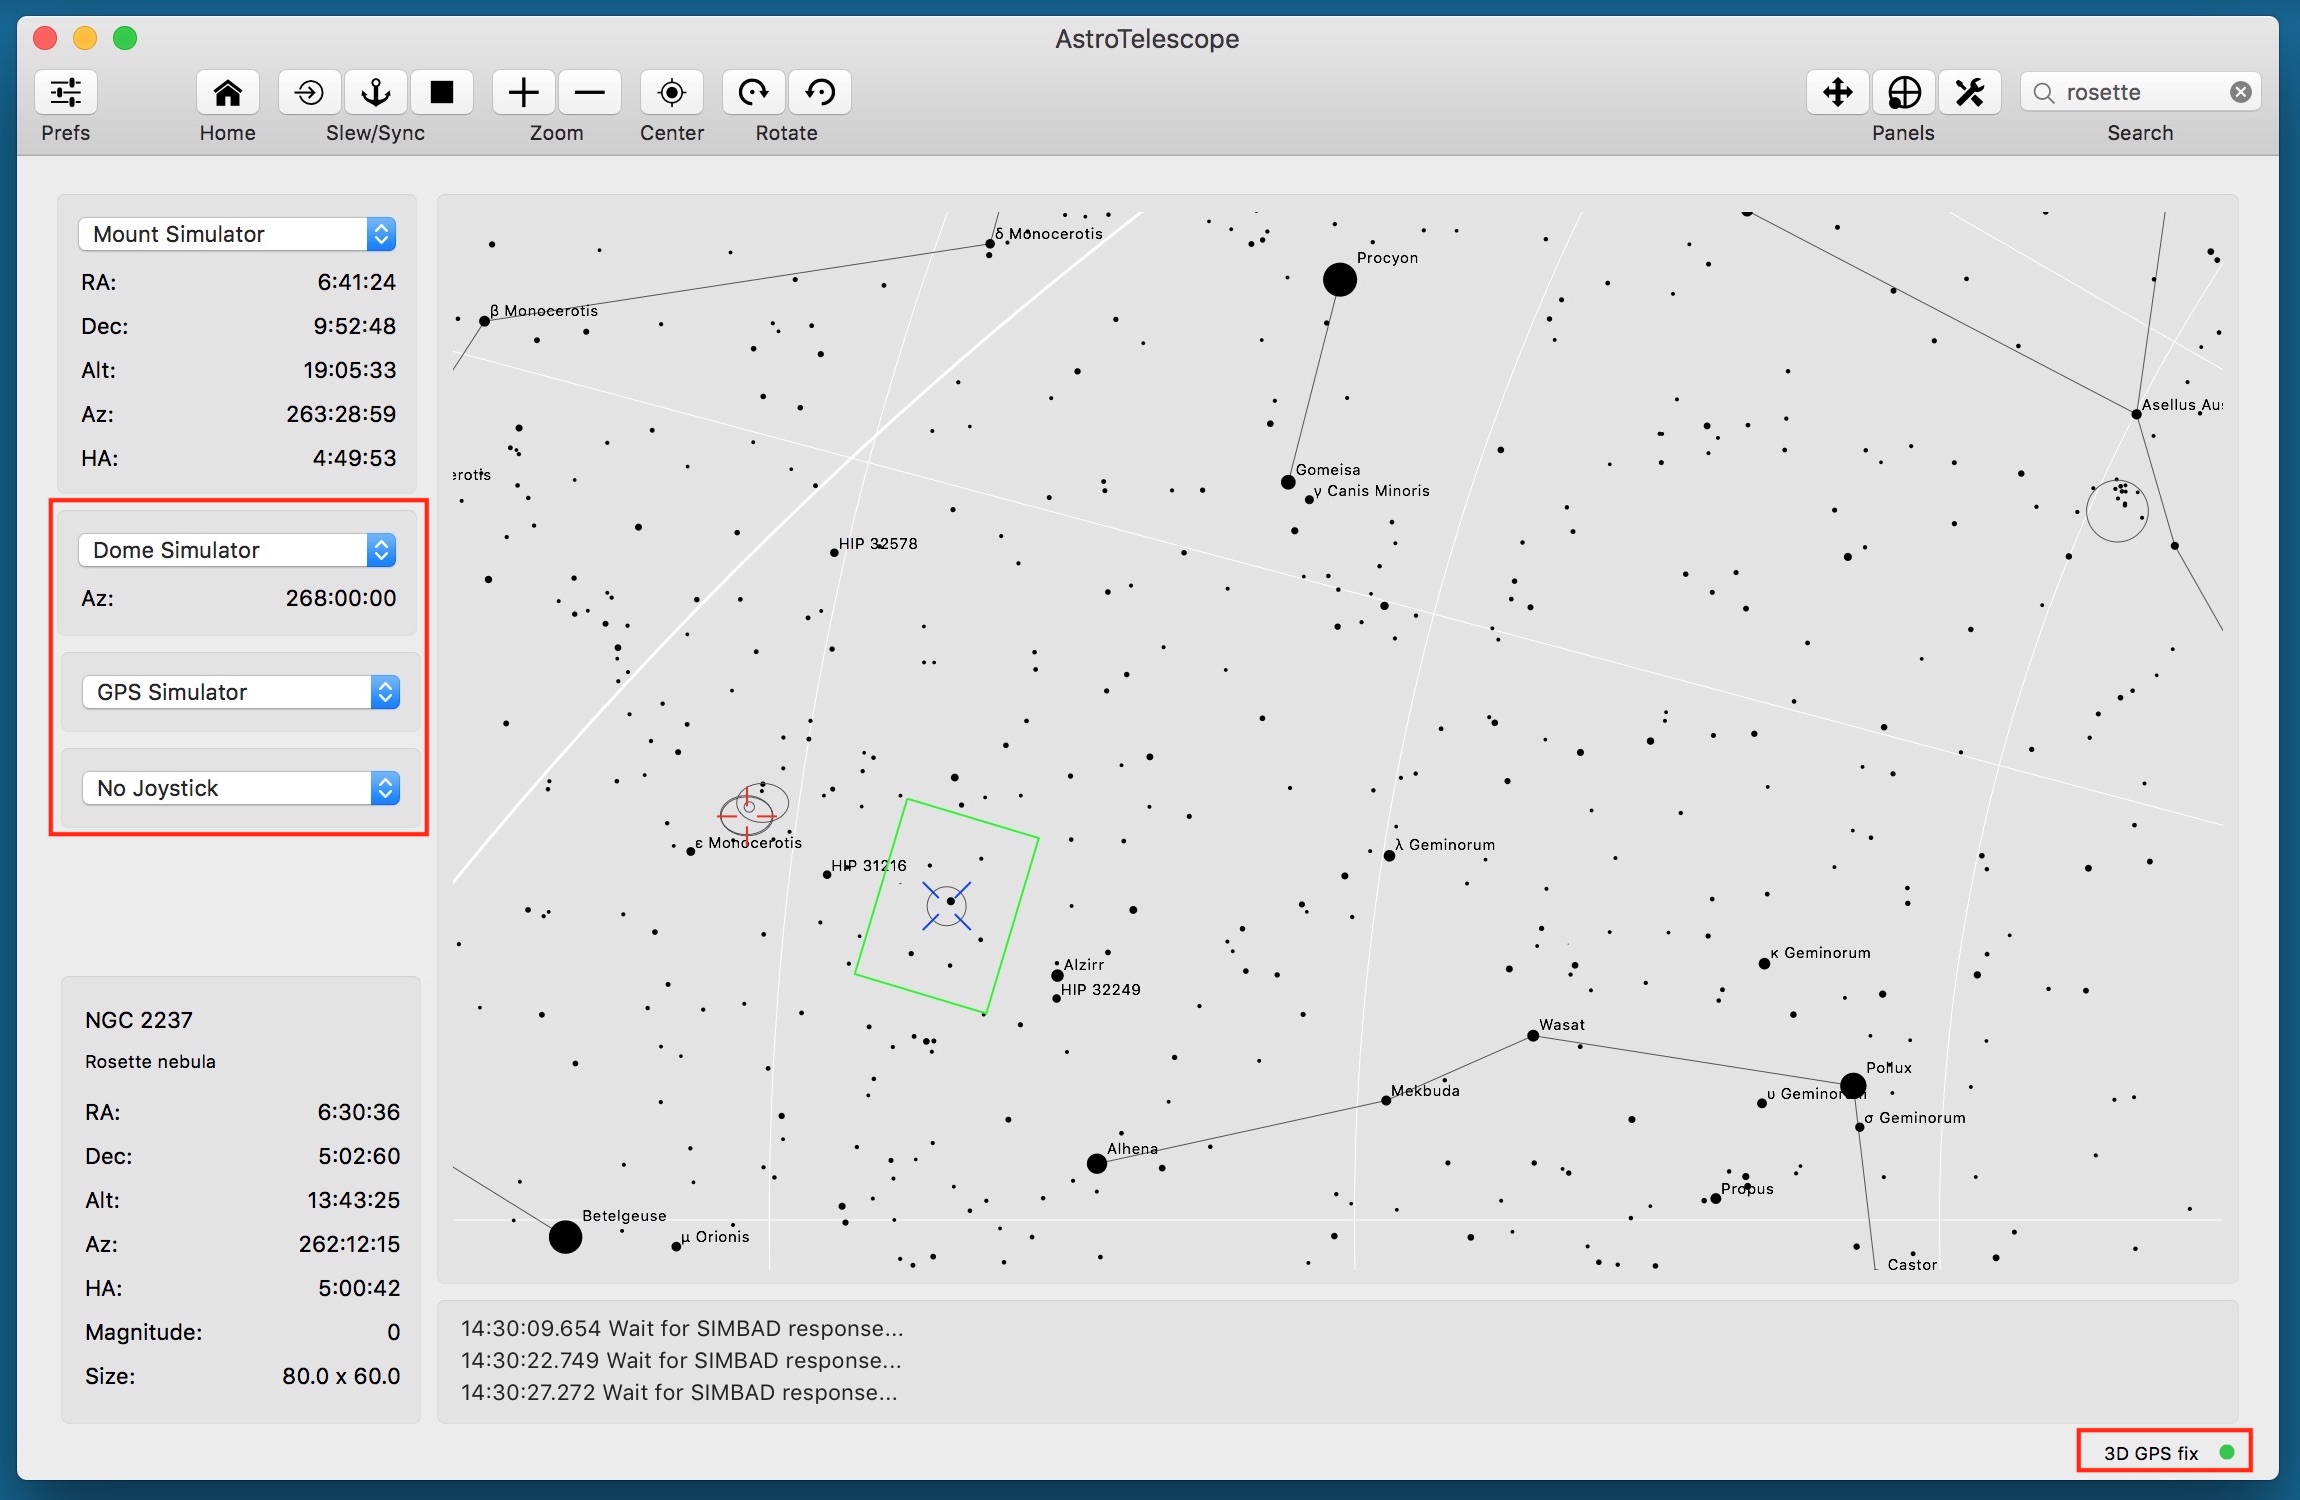
On the mount panel you can select an active mount and to watch its position in equatorial and horizontal coordinate system:
- right ascension,
- declination,
- altitude,
- azimuth and,
- hour angle.
Actual position of the mount is represented by the blue marker and green field-of-view indicator on the star map. FOV size can be set either manually in Preferences on Star Map pane or is set automatically by AstroImager by plate solver helper.
On the current object panel you can see name, description, coordinates and magnitude and size of the selected object. You can either select the object on a star map, select it from the result of a search query from local catalogue or SIMBAD or to enter the coordinates directly. Selected object is represented by the red marker on the start map. SIMBAD query needs an internet connection, but the last ten results is saved and can be selected offline from Control menu. Whenever you use slew or sync operation and no object is selected, AstroTelescope will prompt for the coordinates.
There may be some mount specific parameters. To set them, to use INDIGO or INDI control panel instead while AstroTelescope is running and device is connected. Make sure that you saved the configuration before closing control panel (configuration control property in main group).
Dome, GPS and joystick panels, operations and state

On the dome, GPS and joystick panel you can select a device to be synchronised with active mount. The dome will follow the mount in a slave mode, both the mount and the dome will read the position and UTC time from GPS receiver and mount can be controlled by the joystick.
There are some limitations in the distribute environment. Synced devices should be either all local, all on the same remote server or at least the slave device should be local. E.g. you can control remote mount by locally connected joystick, but you can't control locally connected mount by the joystick connected to a remote server. This is a limitation imposed by INDIGO communication protocol.
When a GPS receiver is selected, you can monitor its fix state in the statusbar.
Joystick can be used either in analog (if it has an analog stick) or in digital mode. If analog mode is used, both mount speed and movement direction are derived from the stick position, while in later case speed is controlled by the buttons. In driver settings you can map joystick buttons and stick to particular operations. By default the first stick is used to control the mount in digital mode, with buttons 6 and 8 mapped to park/unpark operations, buttons 5 and 7 to tracking on/off operations, button 9 to abort mount movement operation and buttons 1-4 to guide, centering, find and max rate settings.
Star map panel

On the star map panel you can see the sky at the current time as seen from the current location. Map contains the stars from HIP catalogue
You can zoom it on and off, rotate clockwise and counterclockwise and center on the current mount position.
On the star map panel you can see the sky at the current time as seen from the current location. The map contains the stars from HIP catalogue and selected objects from Messier, NGC and IC catalogues. Also the Sun, the Moon and the planets are drawn if they are visible.
If the Sun or the Moon is selected, mount is automatically switched to solar or lunar tracking speed.
The star density (by limiting the star magnitude), whether to show labels and what font to use can be configured in Preferences on Star Map pane.
Manual control and Polar alignment helper panels

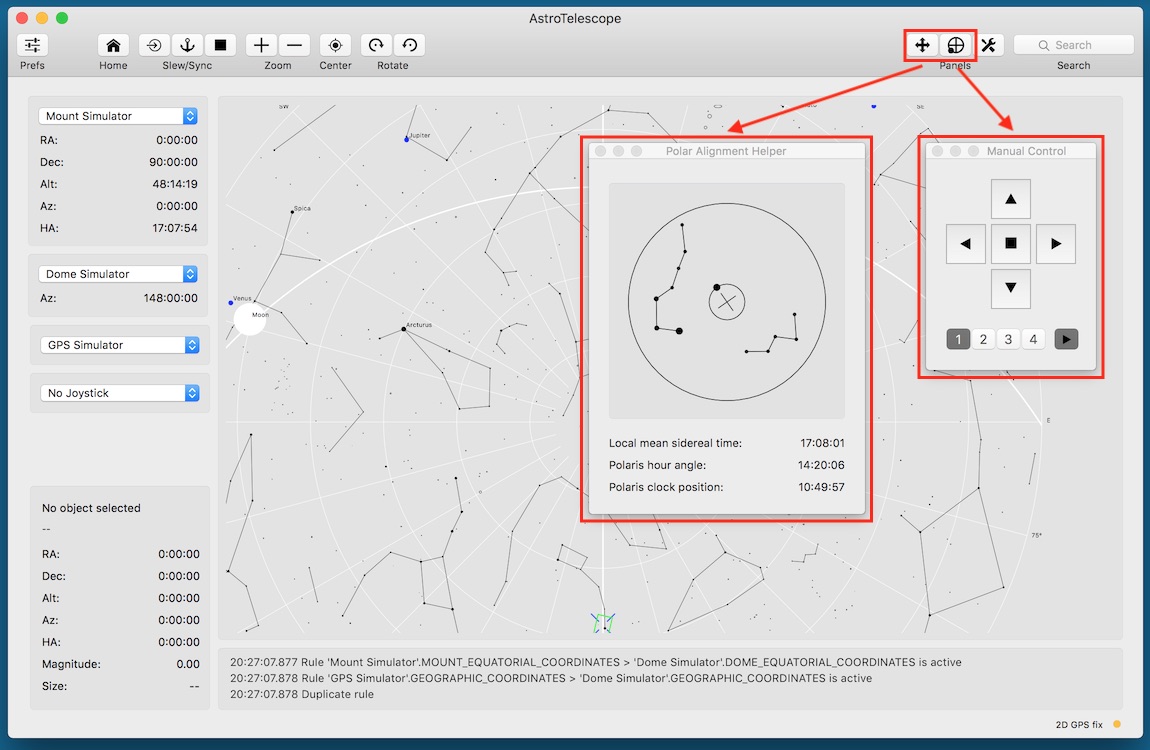
With Manual control panel you can move the mount in any direction with any speed and to turn tracking on and off the same way as with joystick.
Buttons 1-4 controls the speed, where 1 means the slowest and 4 the fastest rate available for the mount. Tracking button turns tracking off or on with the rate depending on what object is selected on the star map.
You can set the meaning (swap the axes or swap the orientation of any axis) in Preferences.
With Polar alignment helper panel can help you to align the mount by simulating, what should you see on the polar scope reticle and/or how to set polaris hour angle or clock position on different kinds of polar scopes.
What you see depends on correct time and geographical coordinates settings.
Control panel

In control panel you can manage all properties of all devices hosted by local INDIGO bus.
To change property, navigate in device / Group / Property tree, enter new values of the items (changed values became red) and click Set.
If you want AstroTelescope to use changed values on the next start, save configuration in "Configuration control" property in "Main" group of the device. You can also set particular profile in "Profile selection" property first.
AstroTelescope device represents AstroTelescope itself and can be used by scripting tools etc.
Please note, that embedded control panel can be used only to control local devices. To access remote devices you need full featured INDIGO Control panel.
Distributed setups
As far as AstroTelescope is based on INDIGO, it can natively use distributed setup, e.g. to control device driver running within other application or on another machine. INDIGO uses bonjour service discovery, so you don't need to configure anything while both AstroTelescope and the remote server are running on machines connected to the same local network. Otherwise you need to add hostname and port of INDIGO service to the list at INDIGO Services tab in Preferences.
Typical example of distributed setup is INDIGO server running on RaspberryPI controlling mount and cameras in the observatory or your backyard, while AstroTelescope runs on Mac computer somewhere in warm room. Another example is INDI driver executed by AstroTelescope as external driver (in this case INDI driver itself acts as a server, just communicating over pipes instead of the network).
You can download INDIGO for various linux platforms (including INDIGO server and device drivers) from www.indigo-astronomy.org. If you want to use Mac computer as remote server, you can use INDIGO Server for macOS.
Device detected by remote servers appears in the list of available devices the same way as local device, just with '@ server' suffix in the name (e.g. 'Titan @ rpi.local').
To setup properties of local or remote devices not managed directly by AstroTelescope (e.g. serial port device names etc.) you can use INDIGO Control Panel. Remember to save the configuration of the device driver (each device has Options section with Configuration page).
Optional INDI Server for macOS
If your device isn't supported by INDIGO, but has INDI driver ported to Mac computers, you can use it with optional INDI Server for OS X. These drivers can’t be bundled with AstroTelescope due to GPL license, but you can download and install them yourself.
Source code of these drivers is available from INDI github repository.
Further questions?
Please contact us at info@cloudmakers.eu or bb.cloudmakers.eu.